The look and feel of your Sitecore-based solution largely depends on SXA themes — sets of assets, such as images, scripts, fonts and style sheets enabled by CSS and JavaScript. They aren’t closely tied to the content and functionality of the solution, and can be created separately from them. To provide the integrity and modularity of a Sitecore-based solution and compile the styling of a number of projects, we rely on Gulp, a JavaScript-based manager that automates frequently performed tasks. With this tool, we can compile scattered stylesheets from different projects in a single CSS file, and place them right where they belong. Read on to learn how styling in Sitecore 9 works in practice.
Choosing and Creating a Theme
First, make sure you have access to Sitecore 9 and SXA 1.8.
There are a few different ways to create a new Sitecore theme:
- Add one when developing a website
- Add one using a script
- Create one manually
It should have a similar structure to that shown in the screenshot below.
Image 1. The Themes.Wireframe
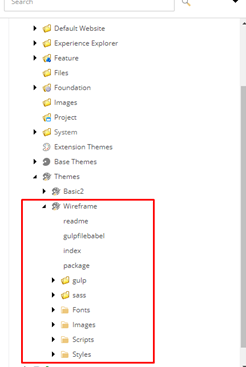
Also, there should be a Gulp folder. In this example, I am using the existing Wireframe theme.
Using a Theme on a Site Component
To use a theme on a website component, open Experience Editor, click Theme in the Select Theme pop-up window, and then choose what you need.
Image 2. The Theme button

Themes can be different for different devices. A specific one can even be created for mobiles and for printing purposes. We are choosing Wireframe, a standard theme, for this item and for the default device.
Sitecore 9 and Gulp Setup
- Browse to App_config and enable Gulp. Then, remove the .disabled extension to enable \Website\App_Config\Include\Feature\z.SPE.Sync.Enabler.Gulp.config.disabled.
- In Experience Editor, choose the Experience Accelerator tab and press the Export button. In the modal window, make sure that you export a ZIP file and that you choose the proper context.
Image 3. Theme export

3. After you press Next, all pages of this site are exported. Certain errors can arise if the component isn’t adjusted to work in Experience Editor. Then, download the archive and unpack it into the project’s repository. Later, this code will be pushed into the repository.
Image 4. Export popup
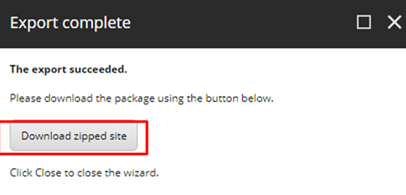
4. Browse to the theme’s root. In our example, the path is D:\MyProject\-\media\Themes\Wireframe\gulp. Generally, the path is: -/media/Themes/[Tenant Name]/[Site Name]/[Theme Name]/gulp.
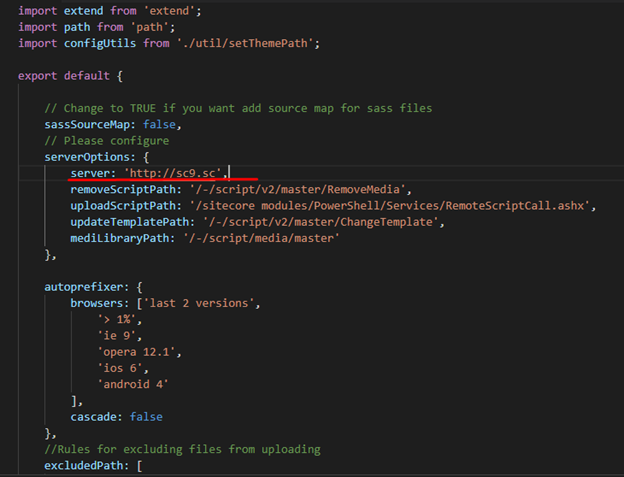
5. Open the gulp/config.js file and change the server box to the name of your site in the Server Options object.
Image 5. Config.js
Configuring a Theme
Open the gulp/serverConfig.json file and configure it in accordance with the current theme. By the way, ProjectPath and ThemePath boxes can be specified in the gulp/config.js file; it depends on the standard template configuration.
Image 6. ServerConfig.json

- In VS Code, press the View tab and open the Terminal in the current folder. Make sure that you use the appropriate version of Node.js (6.10 and later). To check it, type node -v in the Terminal.
Image 7. Node.js version

If the node -v command can’t be executed, it’s likely that Node.js hasn’t been installed on the PC.
2. Type the npm install command to install all dependencies required to use Gulp that are specified in json and wait for the execution of the command.
Image 8. Npm install

3. Type npm install -g gulp-cli to install Gulp and Gulp CLI and wait for the command execution.
Image 9. Install gulp-cli

4. Type the gulp Authorize if required, or just press Enter.
Image 10. The Gulp

Image 11. The Gulp
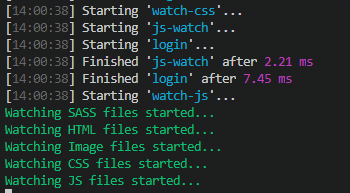
From this moment on, our files can be tracked. Gulp can detect changes in any file and, using PowerShell scripts, sends the information to the server where the theme is located.
Image 12. The Wireframe theme
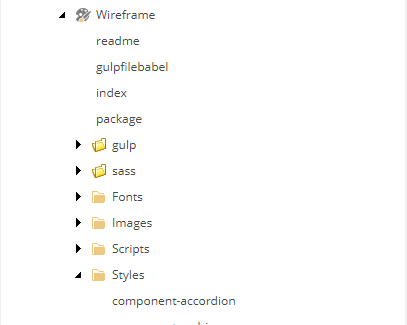
If we make changes to a SASS file, it will transform into a CSS file, and then SASS and CSS files will be sent to the server.
The configuration is located in gulp/config.js and can be changed if required.
Adding a Custom Script
Create a custom.js file in the Scripts folder.
Image 12. The Custom.js file
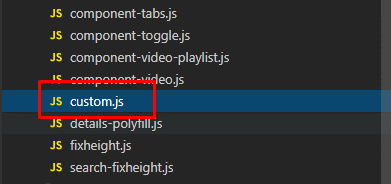
Gulp detects the file immediately after it has been added, and the script that adds it to the server gets executed.
Then, add the following code to custom.js.
Image 13. The Custom script

Open Experience Editor and browse to the console.

To learn more about Sitecore 9 styling, SXA themes and Gulp, feel free to contact me.


 The Latest 15 Information Technology Trends in 2024
 Top 10 Embedded Software Development Tools
 IaaS vs. PaaS vs. SaaS: What’s the Difference?
 10 Examples of Predictive Analytics


![Sitecore Experience Manager Cloud (XM Cloud) [Complete Guide]](https://www.sam-solutions.com/blog/wp-content/uploads/2022/11/Sitecore-Experience-Manager-XM-Cloud.png)
![Why You Should Upgrade to Sitecore 10 [including the Sitecore 9 vs. 10 comparison]](https://www.sam-solutions.com/blog/wp-content/uploads/2022/09/Why-upgrade-to-sitecore-10.png)


![[TechSpeak] Migrating a Legacy Solution to Helix Architecture: a Step-by-Step Guide](https://www.sam-solutions.com/blog/wp-content/uploads/2021/02/Migrating-to-Sitecore-Helix-Architecture-image-1-1024x660-min.png)


